Work/Microsoft Accounts
To access Device Partner Center, you are required to use a Company work account or Microsoft employee account.
What is the difference between a "work account" and "Microsoft account"?
A "work account" is an account created by a member of an external organization in order to enable access to all of Microsoft’s cloud services, such as Microsoft Azure, Office 365, or, in this case, Device Partner Center.
A "Microsoft account" is an employee email that is provided to Microsoft FTE’s and vendors.
Why You Should Register with Device Partner Center?
Enhance your experience and enable new capabilities by completing your Device Partner registration.
Note: If you choose not to register, you will have access only to Device Partner Center
public/anonymous content.
Registering with Device Partner Center (DPC) is simple and takes less than three minutes to complete. By registering, you get an enhanced experience within Device Partner Center, with access to additional content, the ability to favorite content and receive alerts, as well as receiving a targeted content experience. Please follow the registration steps below with your corresponding account type I.E Internal or External.
How to Register with Device Partner Center (External)
Follow the steps below to register to Device Partner Center if you are not a Microsoft Employee or vendor:
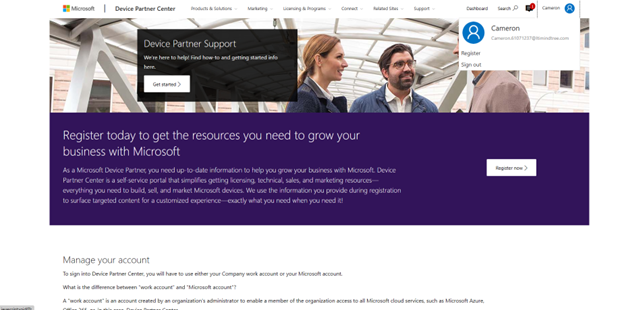
- Begin by visiting Device Partner Center and clicking Sign in/Register at the top right corner.
- Following this, you’ll be met with the sign in portal. Sign in using your corporate work email/password. You will then be redirected back to the Device Partner Center homepage.
- Note: If this account is not Microsoft Entra ID enabled then the below popup will appear:
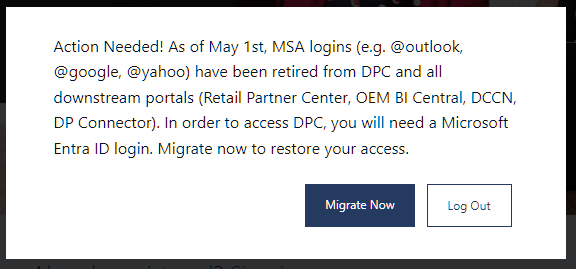
If this is the case, refer to the “Creating a free Microsoft Entra ID (ME-ID) Email below to migrate your account.
- Next, click your name at the top right of the DPC homepage. After the drop down appears, click Register.
- You’ll then be asked to sign in again, make sure you are logging in with an Microsoft Entra ID enabled account, in most cases this will be your corporate work email/password.
- Afterwards, you will be redirected to the DPC registration page. Fill out the requested information and when complete, click Register at the bottom right-hand corner.
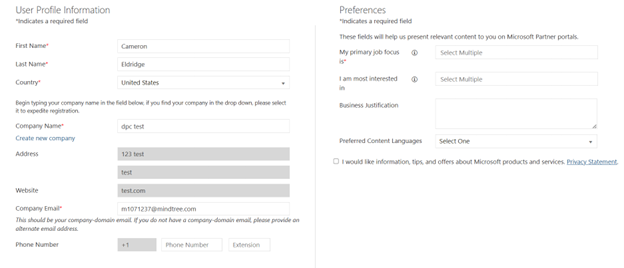
- Note: If you have questions regarding the Preferences section of the registration form, refer to the Preferences section below.
- Once complete, you will be met with a splash page and receive an email confirming your registration. After registration your account will be validated by a Partner Support Team engineer, this will take 48-72 hours before you have secure access to DPC content. In the meantime you will have access to public DPC content:
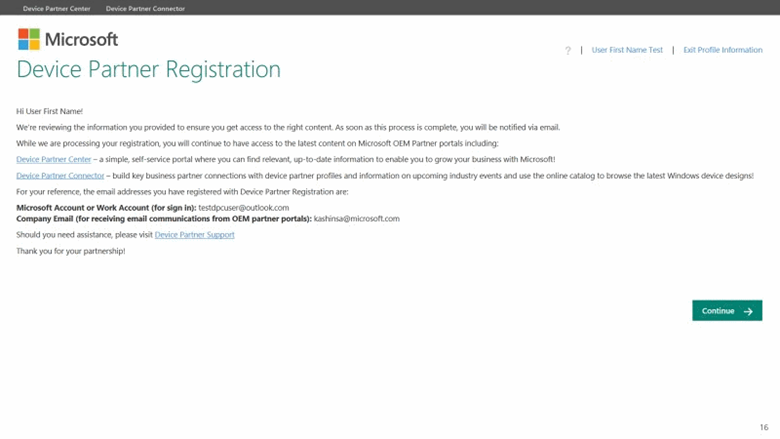
Note: After your profile has been approved, you will receive a second email from the Customer Care Team with confirmation that your access has been validated. If you have additional questions or need assistance, please click this link or email dpcsupp@microsoft.com.
Creating a free Microsoft Entra ID (ME-ID) Email
In the case that you do not have an ME-ID or Microsoft Entra ID enabled email, then you will need to create a free Microsoft Entra ID account at the following link
In order to create a free Microsoft Entra ID account, follow the steps below:
- Once at the Azure homepage, click the green Start Free button.
- Next, sign in using the email of your choice, ideally your corporate email.
- After signing in, fill out the necessary profile information.
- After creating an account, visit the Azure Portal at the following link
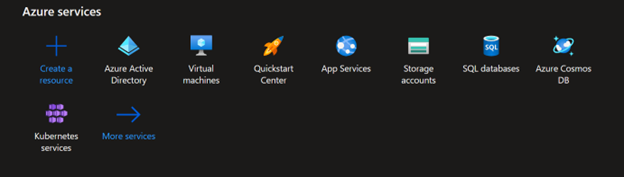
- Once at the Azure Portal homepage, click the Microsoft Entra ID button under Azure Services:
- After under the Default Directory Overview page, click Users under the Manage section. This will display a list of users under this account:
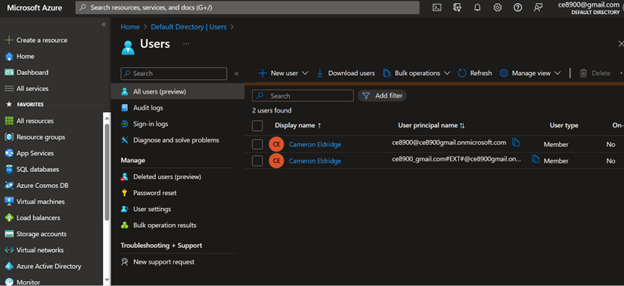
- Lastly, you should see an email address under the User Principal Name column that will end in onmicrosoft.com. Use this email register to Device Partner Center following the “How to Register with Device Partner Center (External)” steps outlined above.
Note: If you have additional questions or need assistance, the following link or email dpcsupp@microsoft.com.
How to Register with Device Partner Center (Internal)
Follow the steps below to register to Device Partner Center if you are a Microsoft Employee or vendor:
- Begin by visiting Device Partner Center and clicking Sign in/Register at the top right corner.
- Sign in with your Microsoft FTE/vendor email and password.
- Next, click your name at the top right of the DPC homepage. After the drop down appears, click Register.
- If you are asked to sign in again, repeat the process. You should now be brought to the registration page:
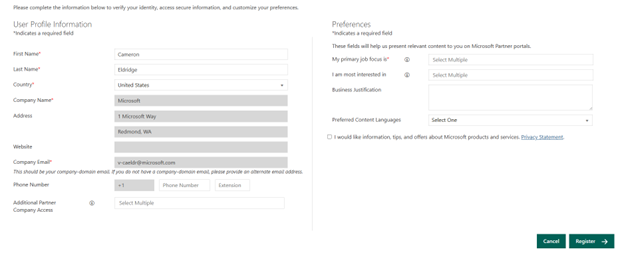
- Fill out the required fields and when complete, click Register at the bottom right-hand corner.
- Once complete, you will be met with a splash page confirming your registration.
Preferences (Registration)
The information provided in the Preferences section of the registration form will affect your experience on Device Partner Center and the content that will be targeted for you.
Note: Certain selections will provide access to additional content that requires extra approval.
- My primary job focus is − This required field enables you to select your role within your company. Options include Engineer/Developer, Finance, Legal, Sales & Marketing, Operations, Customer Service and Support, or Supply Chain. This information will be used to recommend relevant content to you.
- I am most interested in − This field enables you to indicate the type of content that you are most interested in seeing. Options include: Becoming a Partner, Events, Licensing & Pricing, Marketing Collateral, Product Information, Programs & Incentives, Readiness & Training, Technical Downloads, Business Intelligence and Brand Assets (OMAP). This information will also be used to recommend relevant content to you.
- If you are not a Microsoft employee and you choose Brand Assets (OMAP) or Business Intelligence, you will not automatically receive access to this content with access to DPC content. Brand Asset content on Device Partner Center requires additional validation. Business Intelligence content also requires additional validation, and this content is located on the OEM BI Central Portal.
- If you select Business Intelligence, fields will appear for Countries Supported and Region. Your responses to these questions will help determine the appropriate access to the OEM BI portal.
- If you select Brand Assets (OMAP), a field will appear asking if you are an Ad Agency. Please respond to complete registration.
- Preferred Language − This field enables you to indicate your preferred language. This field will be used to provide insight to the localization needs for Device Partner Center.
Updating your Device Partner Center Registration Profile
The Device Partner Registration experience moves with you as your role or content needs change, so keep your profile current and relevant.
To update your profile:
- Sign into Device Partner Center.
- Select your name in the upper-right corner.

- Select View Account.
- Update your details on the Profile Information Management page.
- Tap or click the Save button in the bottom-right corner.
If you need further assistance, contact a support representative by clicking the following link or email dpcsupp@microsoft.com.